
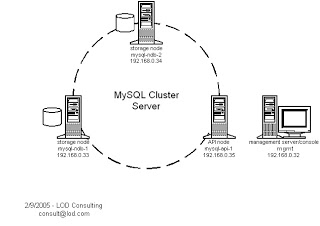
 ในบทความนี้จะใช้เครื่องจำนวน 4 เครื่อง โดยแต่ละเครื่องจะมีหน้าที่ storages node จำนวน 2 เครื่อง (mysql-ndb-1 และ mysql-ndb-2) API node จำนวน 1 เครื่อง (mysql-api-1) และ Management node จำนวน 1 เครื่อง (mgmt)
package สำหรับการติดตั้ง MySQL Cluster
MySQL-clustermanagement-community.xxxx.rpm,

MySQL-clusterstorage-community.xxxx.rpm,

MySQL-clustertools-community.xxxx.rpm,

MySQL-clusterextra-community.xxxx.rpm
เมื่อทำการติดตั้ง package เรียบร้อยแล้ว ต่อมาให้มาที่เครื่อง mgmt และพิมพ์คำสั่งและแก้ไขไฟล์ config ตามด้านล่าง
mgmt# mkdir /var/lib/mysql-clustermgmt

mgmt# vi /var/lib/mysql-cluster/config.ini
[NDBD DEFAULT]

NoOfReplicas=2
[MYSQLD DEFAULT]
[NDB_MGMD DEFAULT]
[TCP DEFAULT]
# Management Server
[NDB_MGMD]
HostName=192.168.0.32 # IP address of this server
# Storage Nodes
[NDBD]
HostName=192.168.0.33 # IP address of storage-node-1
DataDir= /var/lib/mysql-cluster
[NDBD]
HostName=192.168.0.34 # IP address of storage-node-2
DataDir=/var/lib/mysql-cluster
# Setup node IDs for mySQL API-servers (clients of the cluster)
[MYSQLD]
[MYSQLD]
[MYSQLD]
[MYSQLD]
เมื่อแก้ไขไฟล์เสร็จเรียบร้อยแล้วให้ใช้คำสั่ง
mgmt# ndb_mgmd
ต่อจากนั้นก็ตรวจสอบดูว่าคำสั่ง ndb_mgmd ได้รันเรียบร้อยแล้วหรือยังโดยใช้คำสั่ง
mgmt# ps -ef | grep [n]db
จากนั้นมาแก้ไขไฟล์ /etc/my.cnf ของเครื่อง storage node ทั้งสองตามคำสั่งด้านล่าง
mysql-ndb-1# vi /etc/my.cnf
mysql-ndb-2# vi /etc/my.cnf
การแก้ไขไฟล์ของ storage node ทั้งสองเพื่อระบุว่าเครื่องไหนเป็นเครื่อง management โดยให้แก้ไขเหมือนกันโดยใส่ค่าเพิ่มเติมเข้าไปตามด้านล่าง
[mysqld]
ndbcluster
ndb-connectstring='host=192.168.0.32' # IP address of the management server
[mysql_cluster]
ndb-connectstring='host=192.168.0.32' # IP address of the management server
mysql-ndb-1# mkdir /var/lib/mysql-cluster
mysql-ndb-1# service mysqld start
mysql-ndb-2# mkdir /var/lib/mysql-cluster
mysql-ndb-2# service mysqld start
เมื่อทำการ start service ของ MySQL Storage node ทั้งสองเครื่องแล้ว ให้มาตรวจสอบ
เพื่อให้แน่ใจว่าเครื่องทั้งสามได้ทำการเชื่อมต่อกันเป็นที่เรียบร้อยแล้ว โดยใช้คำสั่ง และ
ผลลัพธ์ที่ได้จะเป็นไปตามข้อความด้านล่างนี้
mgmt# ndb_mgm
-- NDB Cluster -- Management Client --
ndb_mgm> show
Connected to Management Server at: localhost:1186
Cluster Configuration
---------------------
[ndbd(NDB)] 2 node(s)
id=2 @192.168.0.33 (Version: x.x.x, starting, Nodegroup: 0, Master)
id=3 @192.168.0.34 (Version: x.x.x, starting, Nodegroup: 0)
[ndb_mgmd(MGM)] 1 node(s)
id=1 @192.168.0.32 (Version: x.x.x)
[mysqld(API)] 4 node(s)
id=4 (not connected, accepting connect from any host)
id=5 (not connected, accepting connect from any host)
id=6 (not connected, accepting connect from any host)
id=7 (not connected, accepting connect from any host)
ขั้นสุดท้ายจะเป็นการเพิ่ม API node เข้าไปเพื่อให้เป้นเครื่องหน้าด่านในการ access database
แก้ไขไฟล์ /etc/my.cnf ตามด้านล่าง
[mysqld]
ndbcluster
ndb-connectstring='host=192.168.0.32' # IP address of the management server
[mysql_cluster]
ndb-connectstring='host=192.168.0.32' # IP address of the management server
จากนั้นทำการ start service MySQL ด้วยคำสั่ง
mysql-api-1# service mysqld start
ทำการตรวจสอบการเพื่อดูการเชื่อมต่อของเครื่องทั้งหมด
mgmt# ndb_mgm
ndb_mgm> show
Cluster Configuration
---------------------
[ndbd(NDB)] 2 node(s)
id=2 @192.168.0.33 (Version: x.x.x, Nodegroup: 0)
id=3 @192.168.0.34 (Version: x.x.x, Nodegroup: 0, Master)
[ndb_mgmd(MGM)] 1 node(s)
id=1 @192.168.0.32 (Version: x.x.x)
[mysqld(API)] 4 node(s)
id=4 (Version: x.x.x)
id=5 (Version: x.x.x)
id=6 @192.168.0.35 (Version: x.x.x)
id=7 (not connected, accepting connect from any host)